Simple, Encrypted Storage on Cloud Services
The Problem
The Problem
I often find myself at a crossroads of privacy versus convenience, where I might have to trade certain amounts of one for the other. In the case of cloud storage, however, I’ve found Google Drive to be an incredibly useful tool for keeping everything in a central, synchronized place.
That said, there are certain things I like to have accessible that I wouldn’t necessarily want laying around unencrypted (VPN configurations, password databases, etc). Until recently, this has presented a bit of a problem: I couldn’t upload these files to Drive, but I also wanted access to them in cases where I needed them most. In addition to this, I also needed something simple and stable, that worked out-of-the-box on my and other’s machines (in lieu of a full FUSE/Encfs stack).
Enter Disk Utility
Thankfully, OS X’s Disk Utility application allows us to quickly and easily create encrypted disk images and volumes. Storing files within an encrypted image will ensure that they are kept secure and out of the reach of prying eyes, despite being kept on public cloud storage services.
To create an encrypted disk image, simply go to File > New Image > Blank Image. This will pull up the blank image creation menu:
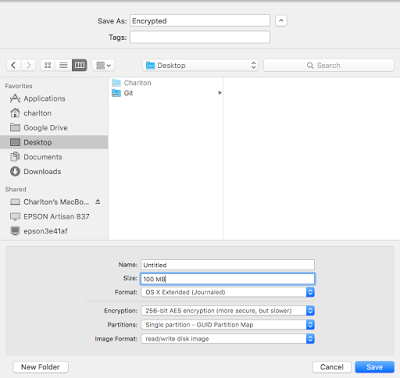
Here, you can specify the name of the image, its size (note that size is fixed and not dynamically allocated! A 100MB disk image will stay 100MB, even if it contains no files.), format, and partition map.
I’ve filled in these settings to what I recommend, though you can tweak them to your liking. I do recommend using AES256, as it is more secure than 128 bit and more or less industry standard.
Another thing to note is that the Image Format field must be set to “read/write disk image” if you want the ability to copy files to/from the image freely.
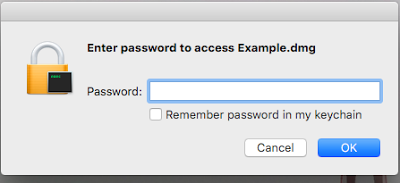
Once you’ve set a password for the image and clicked Save, Disk Utility will prepare your image, and you’ll be off to the races.
Using the Disk Image
After the image has been made, move it to the synced folder for your cloud service. To mount, double click the newly minted .dmg and enter the password you set when the image was created. The image will then be mounted like any normal disk, and you can copy files to/from it.
When you’re finished with your files, unmount the disk so that changes can be synced. Rinse and repeat!
Caveat
The only downside to this process that I’ve yet found is that after any change has been made ot the image, the entire thing has to be reuploaded. This isn’t a huge problem, as I tend to keep these images on the smaller side of things (1–200MB), but for larger images or slower connections, the upload time could be something of an issue. I suppose this is the price you pay for the added security ¯\_(ツ)_/¯
Originally published at blog.ctis.me on March 15, 2016.